

Pour commencer , du crochet
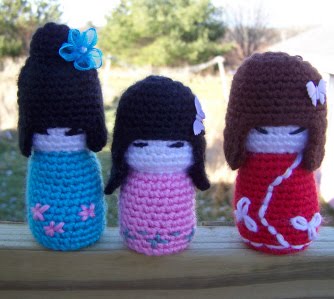
Et donc pour ouvrir ce blog , je commence par un modèle de poupée Kokeshi (qui est une poupée traditionnelle japonaise, vous devez connaitre ces kimmidoll que l'on voit un peu partout en france?)
j'ai trouvé ce modèle très mignon sur un site anglais, je vous joins les explications ci dessous!
bon crochet!!!
Kokeshi Dolls
A crochet pattern by Michelle McLaughlin
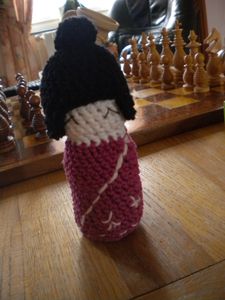
Finished dolls measures approximately 4” tall.
General Tips & Techniques:
* Be sure to keep yarn tension firm and consistent throughout your work.
* At the end of each row, I have given the number of stitches you should have. This is just a guide. If you are off by 1 or 2 stitches, don’t worry about it. Amigurumi is very forgiving.
Abbreviations:
ch chain
hdc half double crochet
sc single crochet
sk skip
sl st slip stitch
st stitch
Materials:
Worsted weight yarn in white, black or brown for hair, and color of your choice for dress
Crochet hook size D
Stuffing
Yarn needle
Kokeshi Dolls Pattern:
Beginning at the top of the head:
Row 1: With white, ch. 4. Join with sl st into first st. Work 8 sc into center ring and around tail. Do not join. Pull tail to close the hole in the ring, 8 st. Place marker at beginning of row.
Row 2: 2 sc in each sc around, 16 st.
Row 3: *2 sc in next sc, 1 sc in next sc*, repeat from * to * around.
Rows 4-10: 1 sc in each sc around.
Row 11: *1 sc in next sc, sc2tog*, repeat from * to * around.
Row 12: 1 sc in each sc around.
Add facial features at this point.
Change to dress color.
Row 13: *1 sc in next sc, 2 sc in next sc*, repeat from * to * around.
Rows 13-22: 1 sc in each sc around.
Row 23: 1 sc in each sc around. Join with sl st and end.
Bottom of Body:
Row 1: With dress color, ch. 4. Join with sl st into first st. Work 8 sc into center ring and around tail. Do not join. Pull tail to close the hole in the ring.
Row 2: 2 sc in each sc around.
Row 3: *1 sc in next sc, 2 sc in next sc*, repeat from * to * around. Join with sl st. and end, leaving a long tail for sewing.
Hair:
Row 1: With black or brown, ch. 4. Join with sl st into first st. Work 10 sc into center ring and around tail. Do not join. Pull tail to close the hole in the ring.
Row 2: 2 sc in each sc around.
Row 3: *1 sc in next 3 sc, 2 sc in next sc*, repeat from * to * around.
Row 4: 1 sc in each sc around.
Row 5: *1 sc in next 3 sc, 2 sc in next sc*, repeat from * to * around.
Row 6: 1 sc in each sc around.
Row 7: 1 hdc in next 24 st. Ch. 1, turn.
Row 8: 1 hdc across 24 st. Ch. 1, turn.
Row 9: 1 hdc across 24 st.
Row 10: 1 sc in each sc and row all the way around the hair. Join with sl st and end, leaving a long tail for sewing hair to the head.
Bun (optional):
Row 1: With hair color, ch. 4. Join with sl st into first st. Work 8 sc into center ring and around tail. Do not join. Pull tail to close the hole in the ring.
Row 2: *1 sc in next sc, 2 sc in next sc*, repeat from * to * around.
Row 3: 1 sc in each sc around.
Row 4: 1 sc in each sc around. Join with sl st and end, leaving a tail for sewing.
Finishing:
Stuff head and body firmly. Sew the bottom of the body to the body, leaving a 2" gap. Stuff the rest of the body firmly and sew the gap closed.
Using the tail of the bun, sew it to the top of the hair.
Using the tail left on the hair, sew a few stitches through the hair and into the head to keep the hair securely in place.
Feel free to link to this pattern, but please do not reproduce this crochet pattern on another website.
This pattern is free from any restrictions. You may sell anything you make with this pattern. However, please do not sell the actual pattern itself.